Monday, January 16, 2017

Poster Project Alternative

Just like every other teacher I know, my goal is not only to teach the content of my course, but also to prepare my students for the next level as much as possible.  Sometimes in the pressure of making sure students are prepared for THE TEST at the end of the year and that we teach all the standards of our courses, we lose sense of the bigger picture and forget that for our students leaving our class is not the end.  Next year they will move on to something else.  Whether that next step is the next grade/course, a job, or college is irrelevant.  The point is, for our students the class we teach is not the end but is merely a stepping stone on their path.  With that in mind, I have intentionally focused this year on making assignments that prepare my students for the next step.

I have discovered over the last several years that while we assume our students are technology savvy, most of mine are not.  Anything that is not a social media app that runs through their cell phones seems to be out of their realm of experience.  I don't know if my students are the exception, but they seem to struggle with figuring out how to manipulate new programs.  With this in mind, knowing that many of my students will be going on to college and job opportunities that require the ability to figure out how to manipulate new programs, I decided that this was an area I needed to address in my class. 

This week in Honors Advanced Algebra we tackled a project that required students to make an infographic using a web-based program that was unfamiliar.  Prior to beginning the project I discussed the motivation for the project with my students and explained my reasoning for requiring them to use a program with which they were unfamiliar.  I also made a sample for my students and posted it in my room so my students had a visual of what an infographic looks like.  My students rose to the challenge, which I'm very excited about.   The assignment, as well links to a few samples are linked below.  This project was designed as a summary of transformations of cube root functions, but it could be easily modified for a different function type.  Also, my sample infographic was based on square root functions so that students could view a model, but they could not simply copy and paste my work.  


Saturday, January 7, 2017

Real-World Applications in the High School Math Classroom

Why is it so hard to integrate real-world applications of math into the classroom?  So much of what I've been able to find in textbooks and other resources is so contrived it's ridiculous, and the kids know it.  It's hard enough to get get kids excited about investigating mathematical ideas, but when the scenarios we pose are so far outside the realm of what anyone would ever do it just makes it harder.

I try to incorporate legitimate (or as legitimate as I can make them) application scenarios in every unit in my Honors Advanced Algebra class.  Of course my kids whine and complain; how many teenagers actually want to do word problems in math class that require them to think?  I continue to persist though, and eventually the whining fades and my students become resigned to the fact that they are a required part of every unit.  Every year I get a little bit better about incorporating applications into the curriculum and it becomes a little bit easier to design scenarios that contain a little bit of realism.  One thing I have discovered is that anything that allows the students to build or experiment with something that is hands-on makes things much more interesting and grabs students' interest.

Here are a few examples of things I have done with my students in the last couple of years.

  • Measuring angles of elevation with hypsometers in a repeater Geometry class.  
I don't know what standardized testing days look like everywhere, but there are days it means I have a class of kids for 3+ hours because we don't transition while major tests like the Milestones are given, and at the high school level these tests are only given in certain classes.  Let me just say that getting 3+ hours of math out of a group of kids who don't like math is an 'interesting' challenge.  My solution with a group of Geometry students I had last year was to make homemade hypsometers and use them to calculate the height of the flagpole out in front of the school, the height of the awning in front of our main entrance, the distance from the ground the science hall windows, etc.  We took the plastic protractors we use in class, taped straws to the straightedge side, tied fishing line through the hole in the middle of the protractor, and put a fishing weight on the bottom of the fishing line. You hold the protractor upside down, look through the straw and you can roughly estimate the angle of elevation.  Not an incredibly accurate device, however it suited my purpose and cost me about $5 since I already had a roll of fishing line in my classroom (it's amazing how often it comes in handy).  While I won't say every kid absolutely loved the activity, one of my boys made a point to tell me on the way back to the classroom that the hypsometers were "really cool and he never knew you could do stuff like that".  I called that a teacher win.

  • Catapulting Gummy Bears in Advanced Algebra.
What is better than having candy in math class?  Being able to build a catapult and see how high you can launch it!  Quadratic functions model the basics of free-fall motion using the function            h(t)= -gt2 + v0t + h0 where h = height above the ground, t = time from launch, g = acceleration due to gravity, v0 = the initial velocity, and h0 = the initial height, so we do an activity where we use this function to model the height of a gummy bear that has been catapulted vertically.   I break my students up into groups and have them build a 'catapult' they will use in order to launch their gummy bears.  I have supplies for them to use; normally things rulers, rubber bands, highlighters they can use a wedges, etc.  I try not to give too much guidance on building the catapult because part of the goal is to get them to think about what type of design would be effective in launching their gummy bear.  I also tell them the goal is launch their gummy bear as vertically as possible because we don't know enough physics and trig to deal with horizontal motion yet.  The more vertical they are able to make their launch, the more accurate their function will be.  After the catapults are built the groups begin their launches.  I normally have them launch from the ground and from something a couple of feet above the ground.  The groups have to video and time their launch (from release until the gummy bear hits the ground).  This gives them the initial height and a (h, t) ordered pair that they can use to determine the initial velocity of their launch.  I then have them answer a series of questions including writing the function that represents the height of the gummy bear over time, determining the maximum height reached by the gummy bear, discussing average velocity, and describing the domain and range of the scenario.  This activity takes a couple of days (we are on 50 minute class periods); it normally takes the groups a little while to settle on a catapult design and get it built successfully, but it is SO worth the time.  It is a lot of fun and hearing the kids discuss the scenario in mathematical terms and explain why the velocity of their gummy bear varies over time, as well as why the velocity as it is dropping is different depending on where the gummy bear is launched from makes my math teacher heart so proud! 


  • Pendulums in Advanced Algebra
We are currently wrapping up our radical functions unit in Advanced Algebra.  I was hunting for a cool application scenario that I could use with square root functions and ran across information on a physics site about the relationship between the period of a simple pendulum and its length.  I took that and ran with it.  It's a very basic concept but a fun one because really, how hard is it to build a simple pendulum to model this scenario?  I begin by having my students do some basic research about simple pendulums (BYOD to the rescue), answer some theoretical questions about scenarios that might impact the period of a pendulum, and then we have some fun.  The kids then get to work together to construct a basic pendulum (that fishing line and weights come in handy here too).  Again, I give them very limited direction on how to construct it and where to suspend it from.  They conduct several trials in which they time the period of their pendulum and then average their results together.  They then compare the results of their experiment to the period predicted by their function and discuss reasons for any major discrepancies.  A word of caution, for this scenario I give them acceleration due to gravity in m/sec^2 and they tend to measure their pendulums in inches.  This leads to a great discussion about the importance of units and knowing what units they are working with.  


Feel free to take any ideas here and run with them.  I know that my best ideas are normally sparked by something I see another teacher using.  Also, if you have any great applications that you use in your classes I'd love to hear about them.  I'm always on the lookout for new things to do with my kids.


Thursday, December 22, 2016

Desmos Activities

Thanks to one of our county curriculum coordinators, I have discovered Desmos Activities.  I have used the Desmos online graphing calculator for several years, but had never checked out the options for classroom activities.  I must say, I wish I had done so sooner (no, Desmos is not paying me to advertise).  There are quite a few pre-made activities to choose from; some made by the Desmos staff and some shared by teachers.  There is also a feature that allows you to create and share your own activities.

I took advantage of the ability to create your own activities and made one for my Geometry kids to practice with the properties of parallelograms.  Here are a few screen shots of my activity.
Multiple Select Question

Free Response Question

Card Sort

I checked out a classroom set of Chromebooks from our Media Center (we are blessed with access to such technology) and did this as a classroom activity.  My students enjoyed the variation in our routine, and I was able to see their work on my iPad and give feedback as they were working.  I will definitely use this activity again.

I have set up another activity for my Honors Advanced Algebra students to investigate the graphs of cube root functions.  We will do this after we return in January.  Hopefully it goes as well as the one that I did with my Geometry classes in November.  Here are a few screen shots from the Advanced Algebra activity.  

Free Response - Students can view each others' answers

Graph with sliders so students can investigate the impact of changing various parameters

Students create their own graph

Free Response - Answer viewable only by the teacher

Multiple Select Question

The links to my activities are below.  Check out some of the other activities available also.  There is lots out there!

Saturday, August 20, 2016

Pair Race Activity

Finding new activities that can be used to help basic mathematical skill development can be difficult.  I ran across this idea last year at another blog (I'd credit the blogger if I could remember where I found this) when I was looking for something to use to practice operations with rational expressions.  I've used this idea with both honors students and students who struggle and it worked great with both groups.  Sometimes a little competition goes a long way to motivate kids to work on something they wouldn't otherwise want to do.

The way this activity works is that you design two sets of questions that have the same answers, then pair the kids up.  I have my students turn their desks to face each other and put the page between them with a question set facing each student.  Each student has to work through their question set and the partners compare answers as they go.  If the answers don't match they have to check their work and figure out who made a mistake.  My kids really seemed to enjoy the competitive aspect of this activity.  I normally turn it into a race and give out a small prize for the first 3 groups to finish, or for the 3 groups that get the most completed correctly with all work shown.

Here is a sample of the questions on multiplying square roots that I used with my kids yesterday.  The students in this class are all a semester behind in math and they did GREAT with it.  It is definitely an activity that can be tailored to groups of students of all ability and motivation levels.


Sunday, July 24, 2016

Free Graphing Tool

So I've finally started planning for this year.  I don't have as much done as I had hoped, but does anyone ever?  For my Honors Advanced Algebra class I wanted to design a task where my students analyzed a piecewise function created out of linear and quadratic functions.  I typically use Geogebra and Desmos to create the graphs that I use in handouts and assignments, but I couldn't figure out how to get either one to easily and nicely graph piecewise functions.  In my case necessity is always the mother of a google search.  Fortunately this time I was successful.  I found an awesome (free) graphing tool that will not only graph piecewise functions, it will graph asymptotes, implicit functions and slope fields.  While I won't use all those features, our AP Calculus teacher was quite excited about them.  The site isn't very fancy looking but it's fairly easy to figure out and is definitely a good addition to any list of math resources.  Amazingly enough it is just called "GraphFree" and the website is www.graphfree.com.  I hope you find it as helpful as I did.

Home Page of GraphFree

Snapshot of Graphing Features


Tuesday, July 19, 2016

Summer Project and New Classroom Arrangement

I've really enjoyed this summer.  Between vacation, helping my sister move, and spending time with family I've barely been home long enough to even start on my summer to-do list.  What little time I have been home seems to have been taken up with the never-ending project that I decided was necessary.

I need to totally reconfigure my classroom this year, and I needed a shelf much deeper than a bookshelf to hold graded papers and make-up work for students who have been absent.  Unfortunately shelving deep enough to fit my needs wasn't going to be found in the "random extra furniture" location on campus so off to the thrift stores I went.  I walked in thinking "I have no idea what I need, but I'll know it when I see it."  I had no luck at the first two places, but luckily the third place I walked in had exactly what I was looking for.  After calling a friend to make sure I wasn't any crazier than normal (and to talk her into helping me transport my find since it wasn't going to fit into my car -I measured) I paid $30 for a cabinet that, while a little worse for the wear, was exactly the size I needed.


After taking off the doors, taking out the drawers, adding in a plywood shelf where the drawers were, and a coat of "pool" chalk paint this was the result.


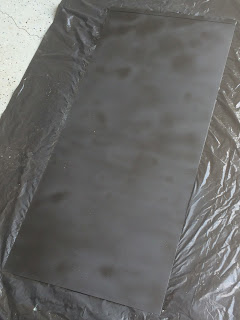
Of course then I decided that I couldn't waste the doors so I got the grand idea to turn them into mini-chalkboards.  I googled "magnetic chalkboard paint" and the first two blogs I pulled up said it doesn't work.  The chemicals in the chalkboard paint counteract the magnetizing properties of the magnetic paint.  Basically you can do one or the other, but if you try to do both it doesn't work.  So much for my grand idea.  Thank goodness one of them gave an alternative.  Buy a cheap piece of sheet metal and spray paint it with chalkboard paint.  Brilliant.  Sheet metal is relatively cheap and I didn't need a lot so I decided to go for it.


Doors from the original cabinet chalk painted in "celery".

Sheet metal spray painted with chalkboard paint.
Magnetic Mini Chalkboard

The final product turned out great. I now have two magnetic mini chalkboards.  One will hold no-name papers (you would think that Sophomores would have learned to write their name on their work but apparently that's not the case) and the other will go over the cabinet with directions on claiming graded work and getting make up work.

With the help of the same friend who helped me transport the cabinet to my garage for its make-over I was able to get it all into my classroom.  The final product was EXACTLY what I needed.
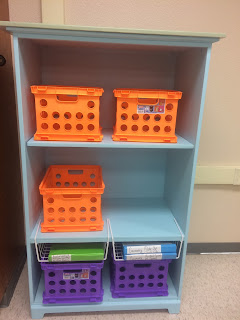
Finished shelving
There are 3 orange crates that will house all graded work.  Each student will have a folder with his/her name on it.  As work is graded it gets filed in these folders.  It is the students' responsibility to pick up their own work.  I tried this last year with half of my classes and it worked great.  No more wasting time in class passing back work and no more papers left on my floor from kids who didn't want their work.  Perfect!  It takes a little bit of time to file the papers, but once you get a system it's not bad at all.

The purple crates (and there will be 3 of them also) will house any handouts/notes/work that needs to be claimed by absent students and the binders above the purple crates have details about exactly what was done in class each day so students know exactly what to look for and what they should turn in.

I've finally admitted that summer is almost over (I got my pre-planning agenda in the mail today so it's official) and I need to get back to work.  My classroom is almost done, there are just a few finishing touches that I need to add and it will be ready.  Maybe during pre-planning I'll actually get to do some planning.

Here are a few pics of my classroom in its current state.  I love the cubicles.  They house all my markers, colored pencils, rulers, and classroom supplies.  They are easy to access but not visible.  Not cheap, but definitely worth it in my opinion.  The pink basket on top of the shelf holds tape, a hole punch, and a stapler.  These are the things the students are allowed to use.  If it's on my desk DON'T TOUCH IT.  The blue baskets to the left of the pink one are my turn in baskets.  There is one for each class period and that is the ONLY place that work gets turned in  I've had these baskets about 5 years and they are worth 10 times their weight in gold.


Yes, my desk and the table in front of it are covered in contact paper and edged with turquoise duct tape.  When the top of your desk and table start peeling off you get creative.


This is the back of the room, and no the desks aren't arranged yet.  The closet in the back is the only storage built into the classroom, hence the cubicles on the other side of the room that I use to store supplies.  In the back by the closet was the best location I could find for my new shelving.  It's well inside the room so students getting their work should not cause a traffic jam at the door, it's away from my desk so I won't have students crowding around my desk looking for things, and it's not taking up space I would be using for desks anyway.  Hopefully it will work well.  I guess we will see in about two weeks.